Adamantine forge bg3, Delving into the Underdark of Baldur’s Gate 3 (BG3) throws your party against formidable foes. To survive and thrive in this unforgiving environment, you’ll need powerful equipment. Enter the Adamantine Forge, a hidden gem that allows you to craft exceptional gear for your adventurers. This guide will delve into everything you need to know about the Adamantine Forge, from its location and operation to the spoils it offers.
Uncovering the Forge’s Secrets
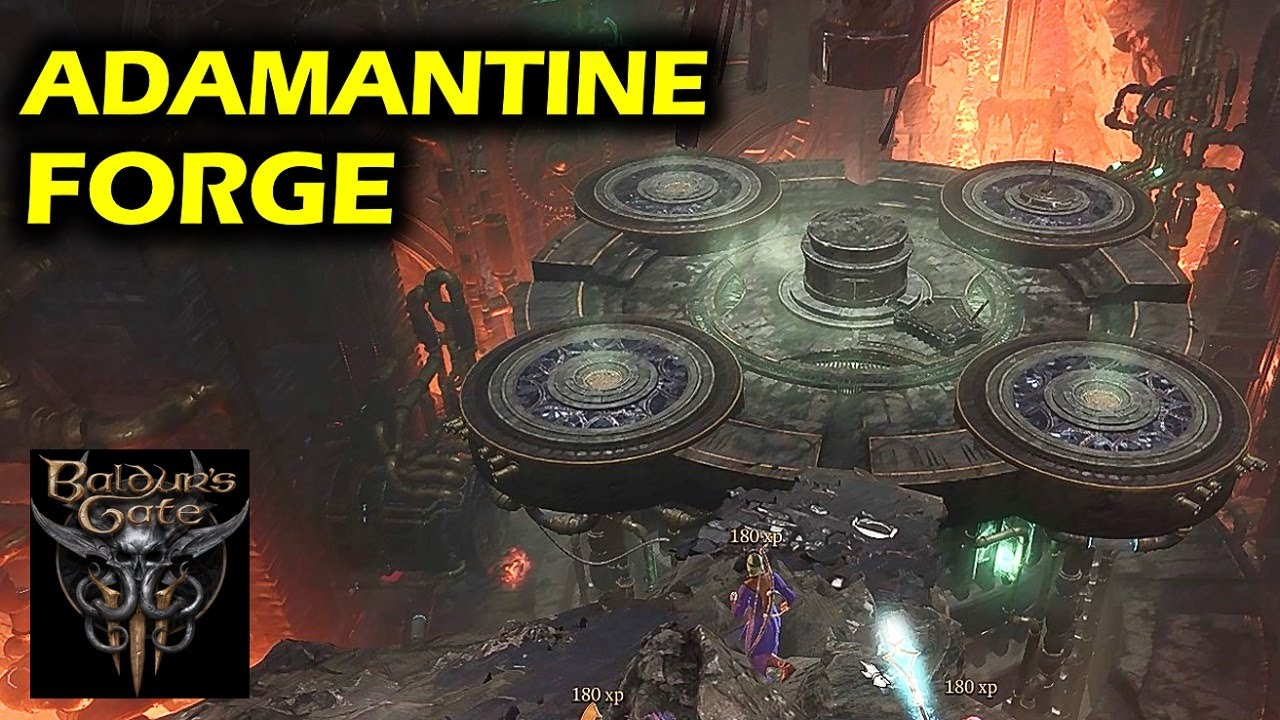
The Adamantine Forge resides within the Abandoned Refuge, an area nestled near Grymforge in Act One of BG3. Reaching it requires navigating the Underdark’s treacherous depths. Once you locate the forge, you’ll be greeted by an imposing industrial marvel, a testament to dwarven ingenuity. But this forge lies dormant, waiting to be rekindled by your party’s enterprising spirit.
Operating the Forge: A Fiery Transformation
The Adamantine Forge is a complex contraption, and using it effectively requires understanding its mechanics. Here’s a breakdown of the process:
Gearing Up: Before approaching the forge, ensure you have the necessary ingredients. You’ll need Mithral Ore, a rare and valuable material found throughout the Underdark. Keep an eye out for shimmering veins that you can mine. Additionally, you’ll require specific Weapon or Armor Molds, depending on the equipment you wish to craft. These molds can be found scattered throughout the game world, often as hidden rewards or loot from enemies.
Priming the Forge: Locate the Mold Chamber on the forge platform and insert your chosen Weapon or Armor Mold. Next, find the Crucible, a large metal basin near the Mold Chamber. This is where you’ll place the Mithral Ore.
Raising the Platform (Optional): The forge operates on two levels. The upper level allows for easier interaction with the Mold Chamber and Crucible. If you need to raise the platform for easier access, locate the button situated behind the lever on the far side of the platform. However, this button can only be activated while standing on the raised platform, so plan your movements accordingly.
Descent into Fire (Literally): The real magic happens on the lower level. Locate the Forge Lever situated on the southern side of the platform. Pulling this lever lowers the forge platform into the fiery depths below. Here, the intense heat plays a crucial role in the crafting process.
Unleashing the Molten Fury: With the platform lowered, interact with the Lava Valve. This action channels molten lava into the chamber, further intensifying the heat.
The Hammer of Creation: Now comes the moment of truth. Pull the Forge Lever once more. This activates a massive mechanical hammer that slams down upon the Mold Chamber, using the combined power of heat and pressure to forge your desired equipment from the Mithral Ore and Mold.
Claiming Your Prize: Once the hammering subsides, the platform will automatically rise back to the upper level. Head to the Mold Chamber and retrieve your newly forged Adamantine equipment.
Important Note: The Mithral Ore will be consumed during the forging process, so be sure to have enough on hand for your crafting endeavors.
Fruits of the Forge: Crafting Options
The Adamantine Forge allows you to create a variety of powerful equipment, significantly boosting your party’s combat prowess. Here’s a list of craftable items and their associated Mold requirements:
Mithral Ore + Mace Mold = Adamantine Mace
Mithral Ore + Longsword Mold = Adamantine Longsword
Mithral Ore + Scimitar Mold = Adamantine Scimitar
Mithral Ore + Shield Mold = Adamantine Shield
Mithral Ore + Scale Mail Mold = Adamantine Scale Mail
Mithral Ore + Splint Mold = Adamantine Splint Armor
Adamantine equipment boasts superior durability and often possesses additional beneficial properties, making it a valuable asset in the Underdark’s perilous encounters.
Beyond the Basics: Tips and Tricks
While the core operation of the Adamantine Forge is straightforward, here are some additional tips to optimize your crafting experience:
Prioritize Upgrades: With limited Mithral Ore, strategically choose which party member benefits most from an Adamantine weapon or armor upgrade. Consider factors like character class, current equipment, and upcoming challenges.
Explore Thoroughly: The Underdark holds many secrets, including hidden Mithral Ore veins and scattered Weapon/Armor Molds. Keep your eyes peeled and explore every nook and cranny to maximize your crafting potential.

FAQ’S
Where is the Adamantine Forge?
You’ll find this fiery wonder deep within the Underdark, specifically in the Abandoned Refuge area close to Grymforge.
How do I use the Adamantine Forge?
It’s a two-step process. First, use levers to lower the forge platform. Then, to craft an item, place Mithral Ore in the Crucible and the desired mold (like a mace mold) in the Mold Chamber. Activate the lever again to unleash the forge’s mighty hammer and create your gear!
What can I craft with the Adamantine Forge?
The forge can transform Mithral Ore into powerful Adamantine gear, including weapons like maces, longswords, and scimitars, or defensive equipment like shields, scale mail, and splint armor.
Where do I find Mithral Ore?
Thankfully, you don’t have to venture far. Mithral Ore veins can be found near the Adamantine Forge itself. Just keep an eye out for sparkly rocks!
Where do I get the molds for crafting?
Molds can be found scattered throughout your Baldur’s Gate 3 adventures. Keep a keen eye on chests, hidden stashes, and rewards from quests.
Is there a recipe guide for the Adamantine Forge?
Yes! The book “The Great Furnace of Grymforge” details the crafting combinations. Mithral Ore with a mace mold creates an Adamantine Mace, and so on.
Can I reuse the Mithral Ore after crafting?
No, the Mithral Ore is consumed during the forging process. Make sure you have enough for the item you want to create.
Is there a guardian protecting the Adamantine Forge?
Some sources mention a fiery guardian appearing after using the forge. Be prepared for a potential fight after crafting your awesome gear.
Can I raise the Adamantine Forge platform after lowering it?
There’s a button hidden behind the lever that lowers the platform. You can shoot it with a ranged weapon while standing on the platform to bring it back up.
Is the Adamantine Forge a one-time use location?
No! Once you discover how to operate it, you can return to the Adamantine Forge throughout your playthrough to craft new equipment as you find more Mithral Ore and Molds.
To read more, Click here