Welcome, Minecraft innovators! Today, we delve into the world of powered rails, the key to creating a fast, efficient, and exciting transportation network within your Minecraft world.
Buckle up, as this extensive guide equips you with all the knowledge you need to craft, utilize, and master powered rails!
Understanding Powered Rails
Powered rails, unlike their regular counterparts, propel minecarts forward when activated. This opens a plethora of possibilities for automating transportation systems, crafting intricate roller coasters, and even designing complex contraptions.
Here’s a breakdown of their properties:
Function: Propel minecarts in the direction they’re facing when activated.
Activation: Redstone signal triggers movement. This can be through levers, pressure plates, buttons, or other redstone components.
Speed: Minecarts on powered rails travel faster than on regular rails.
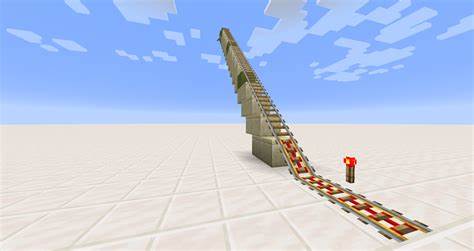
Inclines: Powered rails can propel minecarts up inclines, unlike regular rails.
Crafting Powered Rails
To embark on your powered rail journey, you’ll first need to craft them. Here’s what you’ll gather:
1 Redstone Dust: This is the key ingredient, powering the rails. It can be mined from redstone ore found deep underground.
6 Iron Ingots: These form the base structure of the rails. You can smelt iron ore in a furnace to obtain them.
Crafting Recipe:
Open your crafting table.
Place the redstone dust in the center square.
Surround the redstone dust with iron ingots in a square pattern, filling all eight surrounding squares.
Voila! You’ll have one powered rail in your inventory.
Redstone: The Engine of Power
As mentioned earlier, redstone is the lifeblood of powered rails. It acts as the electrical current that activates them. Here’s a quick rundown on acquiring and using redstone:
Mining Redstone Ore: Look for redstone ore veins deep underground, typically below layer 16. Use an iron pickaxe or higher to mine it.
Redstone Dust: When you mine redstone ore, you’ll get redstone dust, the usable form for powering your rails.
Activating Your Powered Rails
Now that you have your powered rails, let’s get them working! Here are some common ways to activate them:
Levers: Place a lever next to a powered rail. Flicking the lever sends a redstone signal to the rail, activating it.
Pressure Plates: Stepping on a pressure plate triggers a redstone signal, activating the
connected powered rail. This is useful for automated minecart systems.
Buttons: Pressing a button sends a short redstone pulse, momentarily activating the powered rail.
Redstone Torch: Placing a redstone torch next to a powered rail emits a constant redstone signal, keeping it permanently active.
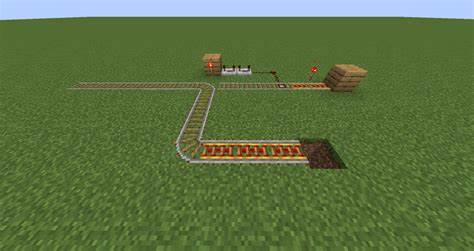
Building a Basic Powered Rail Track
Let’s get started with a simple powered rail track!
Crafting Rails: Craft enough regular rails to build your desired track length.
Placing the Rails: Arrange the rails on the ground in your preferred layout. You can create straight tracks, curves, or even slopes.
Positioning Powered Rails: Insert powered rails at specific intervals along your track. The spacing will depend on the desired speed and whether you have inclines. Generally, more frequent powered rails mean faster speeds and better climbing ability.
Power Source: Place your chosen redstone component (lever, pressure plate, button, or torch) next to a powered rail to activate it. Experiment with different placements to achieve your goals.
Tips and Tricks for Mastering Powered Rails
Now that you have the basics down, let’s explore some advanced techniques to elevate your powered rail expertise:
Minecart Momentum: Minecarts on powered rails gain momentum as they travel. This means you can use fewer powered rails on flat tracks after an initial boost.
Inclines and Powered Rails: Powered rails can propel minecarts up inclines. The steeper the incline, the more frequently you’ll need powered rails.
Vertical Transportation: You can use powered rails to create vertical loops or elevators for minecarts. This requires careful planning and experimentation.
Carts and Droppers: Droppers can be used to insert items into minecarts, allowing for automated item transportation systems.
Unloading Systems: Designate specific sections of your track where minecarts unload items using hoppers or other mechanisms.
Branching Tracks: Use levers or pressure plates to create branching tracks, allowing minecarts to choose different paths.
FAQs
What do I need to craft powered rails?
You’ll need 1 Redstone Dust and 6 Iron Ingots.
Where can I find redstone dust?
Mine redstone ore found deep underground (typically below layer 16) with an iron pickaxe or higher. Redstone ore drops redstone dust when mined.
How much iron do I need for a long powered rail track?
You’ll need enough iron ingots to craft both the regular rails for your track and the powered rails spaced at intervals. The number of powered rails depends on the track length, desired speed, and inclines.
How do I activate powered rails?
Use redstone components like levers, pressure plates, buttons, or redstone torches. Levers and pressure plates provide more control, while buttons offer a momentary activation. Redstone torches keep the rails permanently powered.
Can I use other methods to activate powered rails?
Yes! You can utilize complex redstone circuits involving repeaters, comparators, and other components for intricate activation sequences and automated systems.
How many powered rails do I need?
This depends on your goals. Generally, more frequent powered rails translate to faster speeds and better climbing ability on inclines. Experiment to find the optimal spacing for your track.
Can powered rails propel minecarts uphill?
Yes! Powered rails are crucial for overcoming inclines. Steeper inclines require more frequent powered rails for successful climbs.
The world of powered rails in Minecraft offers endless possibilities for transportation, automation, and creative expression. This guide has equipped you with the knowledge to craft, utilize, and master these incredible tools.
From basic track layouts to advanced techniques like branching tracks and item transportation systems, you now possess the skills to build efficient and exciting networks within your Minecraft world.
Remember, the journey doesn’t end here. Experiment, explore online resources, and unleash your creativity! With a little ingenuity, powered rails can transform your Minecraft experience, allowing you to build intricate contraptions, design thrilling roller coasters, and revolutionize the way you navigate your world. So, power up your imagination and get building!
To read more, Click here